Are you trying to add a background image to your WordPress site? Background images are a great way to make your website stand out from other websites with a similar theme. Adding a background image to your WordPress website can also make yours stand out from your competition. In this article, I will show you how easy it is to add a background image in WordPress.
Why Add a Background Image in WordPress?
Adding a background image in WordPress allows you to differentiate your website from others that use the same theme as your website. Let’s say your website is about cooking, and another website is about exercise. If both websites use the same theme, it may be difficult to tell them apart. Your website is a part of your personal or business brand, and should be as unique as you are. Adding a background image to your WordPress website can help your website stand out from the crowd.
Even if your website is using a unique theme, it can be nice to give individual pages an even more unique look with a background image on a specific page. Doing this allows you to highlight a specific experience that your post is writing about. It can even allow you to sell a branded sponsorship for certain posts or categories, by adding a sponsor’s logo to the background.
The only limit to the possibilities is your own imagination!
How to Add a Background Image in WordPress
There are a few ways to add a background image in WordPress. The first method is really great if you don’t want to mess around with code. The second method is more for the “techy” types who like to dig into the code.
Method 1: Use Full Screen Background Images Plugin to Add a Background Image
Full Screen Background Images is a plugin that is specifically designed to make it easy for you to add background images to your WordPress website. The nice thing about this plugin is that you don’t have to know any code to use it, and you can start using it in minutes.
Before we get into how Full Screen Background Images works, let’s look at some examples of what it can do.
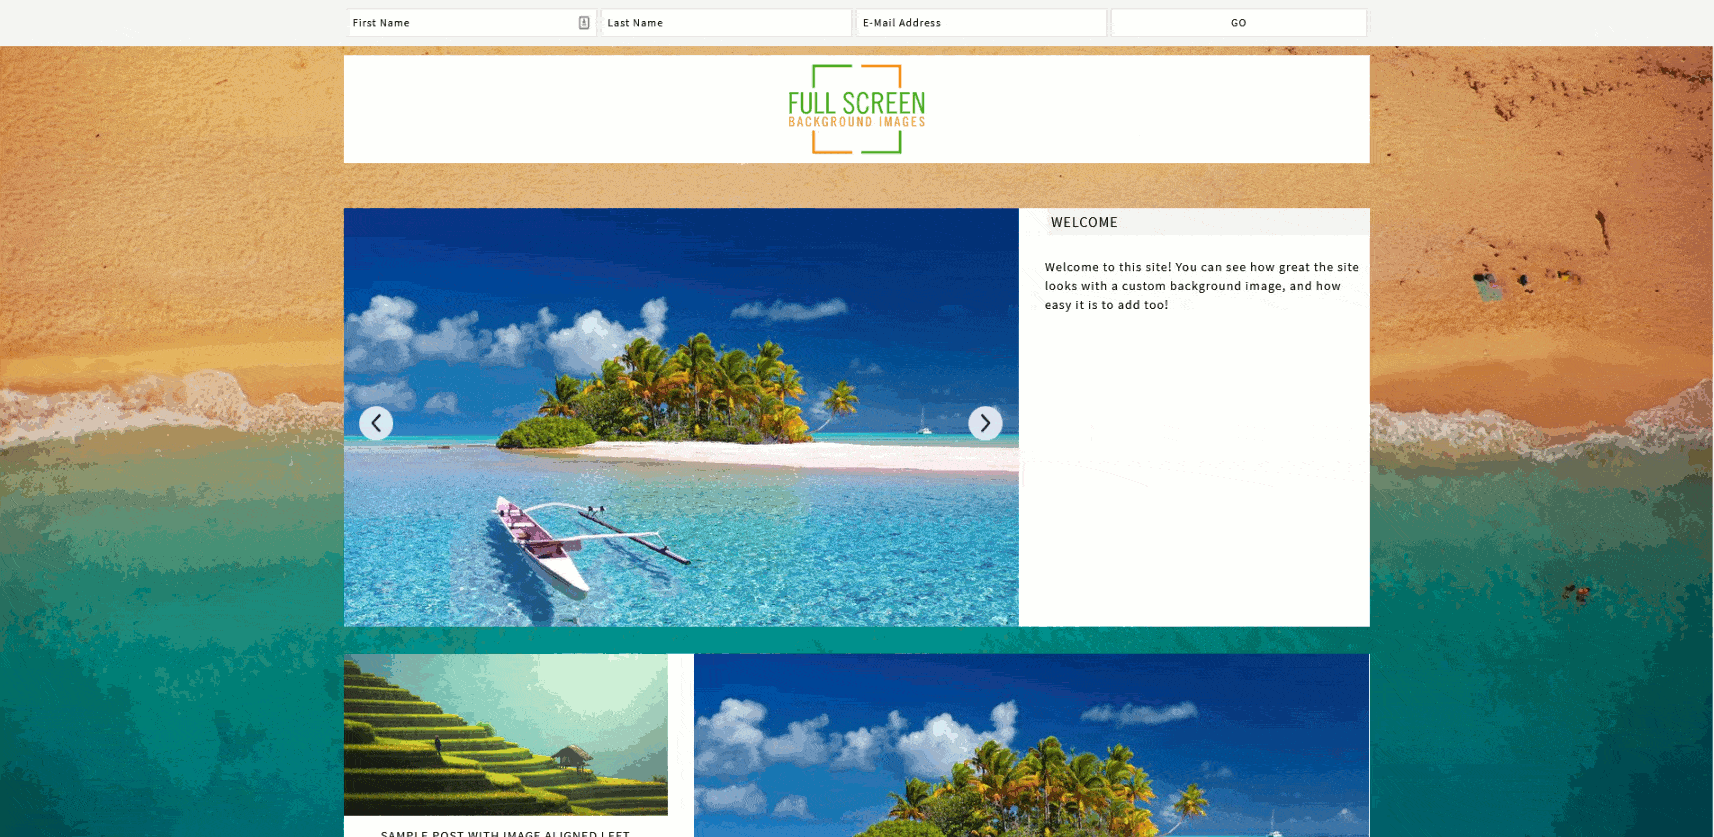
And here are a couple more still pictures in case you’re not a fan of the movement in the GIF above.

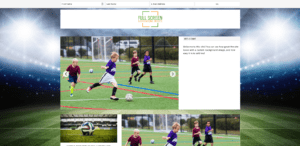
Easily add background images to your WordPress website with Full Screen Background Images.
How to Use Full Screen Background Images
Using Full Screen Background Images is the most flexible option. It is compatible with any WordPress theme and allows you to set the same image on multiple pages, or use a different image on every page on your site. It will make all of your background images cover the full screen and will be mobile friendly, so if a visitor is using a mobile phone or tablet the image will automatically resize itself.
First, you will need to install and activate the Full Screen Background Images plugin. If you need help installing the plugin, reach out I’d be happy to assist.
Once activated, you can visit the Appearance > Fullscreen BG Image settings page.
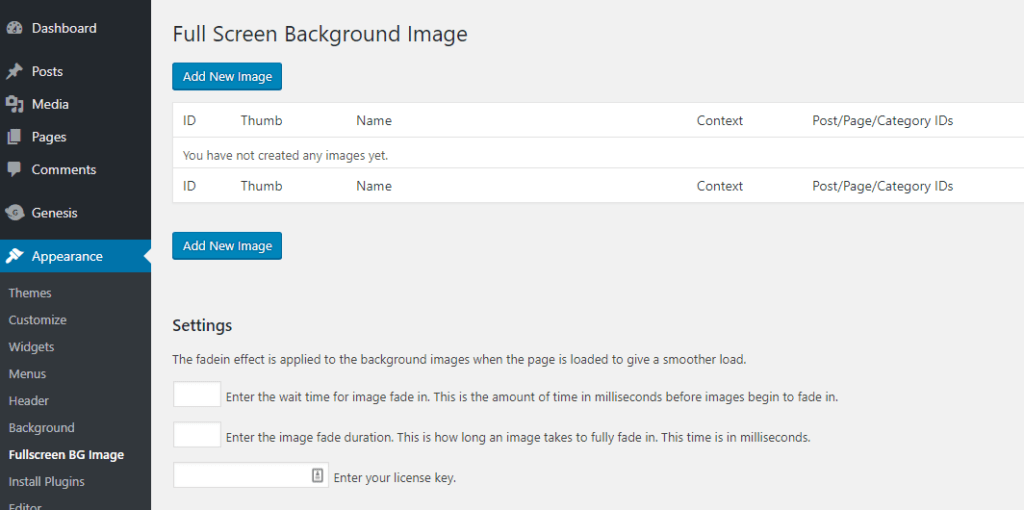
The settings will ask for a license key. You’ll get this in an email after purchasing the plugin. This is only required for easy one-click updates when the plugin’s code is updated.
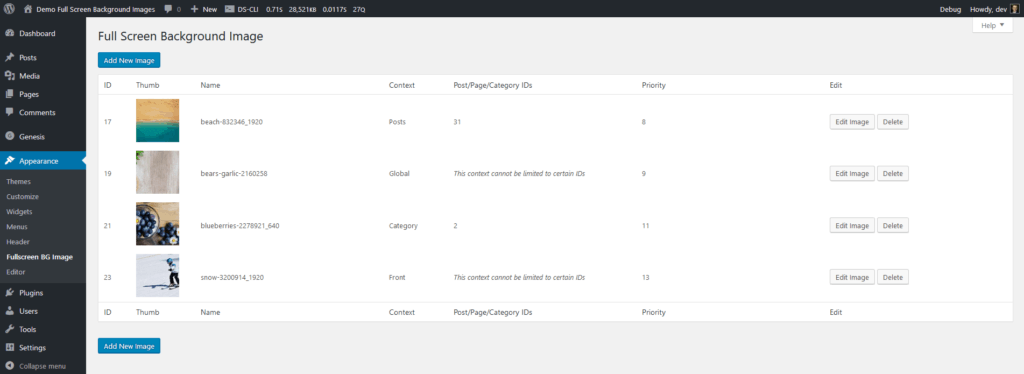
Next, click the Add New Image button, which will take you to the background image upload page.
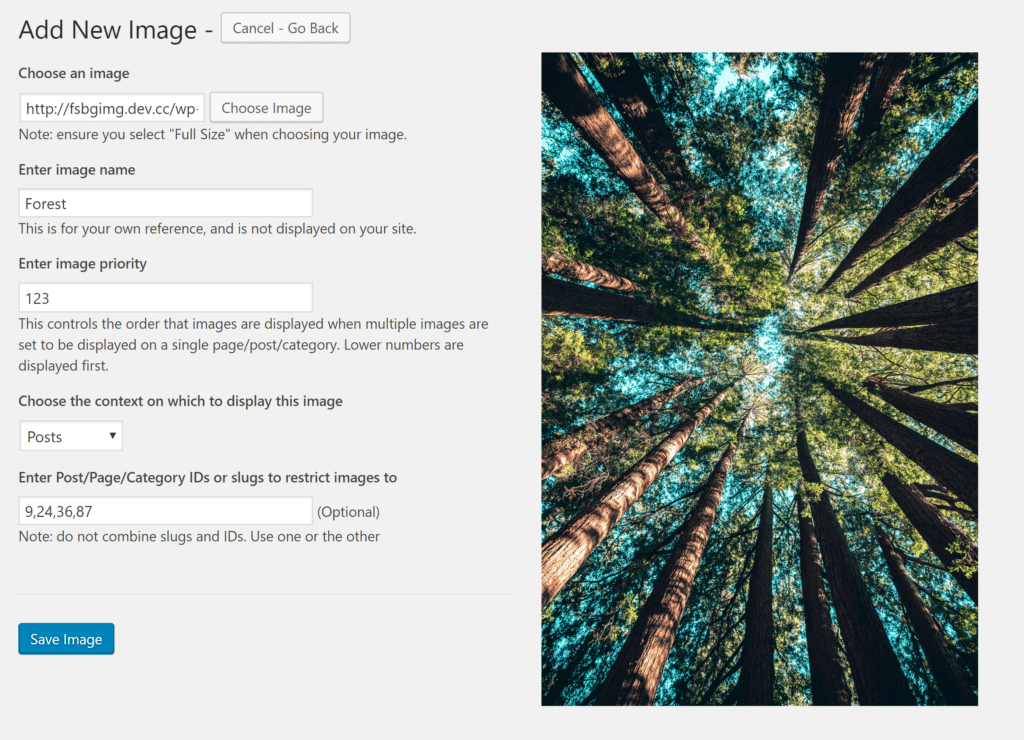
Then, click on the Choose Image button to upload or select a background image. This works the same way as adding an image to a blog post.
You’re given a chance to name the image. This name is only used for your own internal purposes, so you can call the images whatever you want.
Finally, you can select where you want the background image to be displayed. You can choose to set an image globally to be shown on all pages of your site, or select from a number of different sections of your website like your homepage, blog page, search results page, category pages, etc.
Creating a Slideshow Effect
If you set more than one background image to display in a given page, the plugin will automatically show the background images as a slideshow. You can adjust the slideshow speed in the plugin’s settings.

The first setting controls how long a background image stays on the screen. The second setting controls how long it takes for the next image to fade in. So, with a longer time in the second setting the images will slowly fade in. A shorter time will cause the images to come into view much more quickly.
The time you enter is in milliseconds, so if you want a background to fade out after 10 seconds, you would enter 10000.
If you’re unhappy with the order that your background images are displaying in the slideshow, you can adjust this by setting the image’s priority number. The lower the priority number, the sooner it will display the image. So, an image with the priority of 10 will show up before an image with the priority 11. The priority numbers are automatically assigned when you upload an image, but you can adjust them to fit your needs.
Add a Background Image in WordPress on a Specific Page, Category, Post, etc.
It is also possible to add a different background image in WordPress on individual blog posts, pages, or categories.
When editing a page or post, you will see a new Full Screen Background Image box below the post editor.
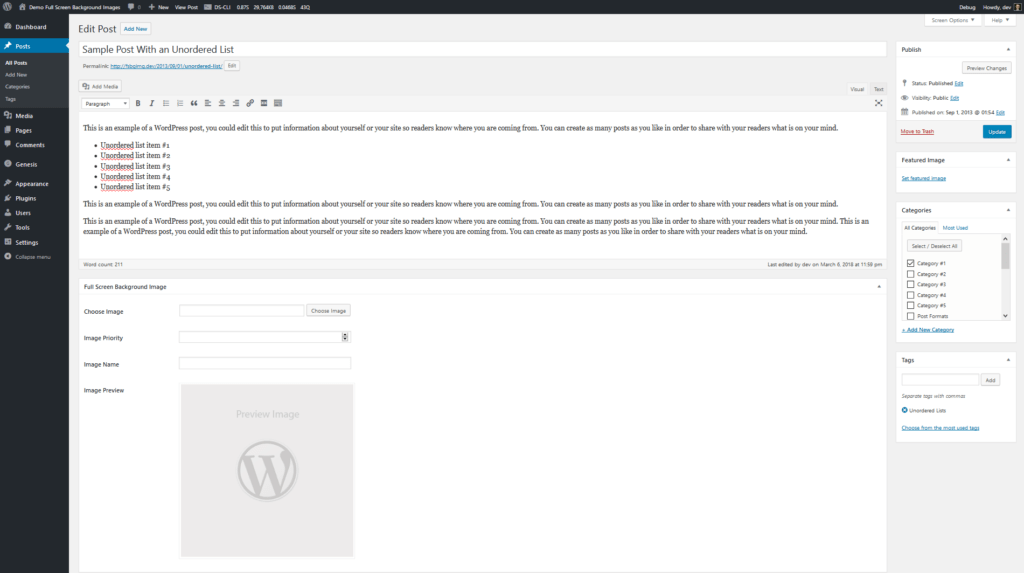
This section works the same way as the Add New Image page we discussed earlier. The only difference is you won’t have the ability to set the context (i.e. show on the home page, etc.) Instead, the plugin will automatically set the context to the specific page or post that you are editing. If you want to edit this and display the background image on other pages, you can go to the Appearance > Fullscreen BG Image settings page. Here you can click the Edit button next to your background image and adjust the context as necessary.
To add a background to a specific category page, you will need to go to the Appearance > Fullscreen BG Image page. Upload a new background image, or edit an existing image, then select Category as the context. You will be given a new option, which asks for the category ID. If you want this background image to display on all category pages, you don’t need to enter an ID here. However, if you want this background image to display on only specific category pages, then you will need to enter an ID (or IDs) here.
To find a category ID, go to Posts > Categories. Click on the category you want the background image to display on, and find the number after tag_ID= in your browser’s address bar.

You can display the same image on multiple categories by entering the IDs separated by a comma. So, entering 1,8,13,27 would display the same background image on categories 1, 8, 13, and 27.
Method 2: Add a Background Image With Code
This method assumes that you have some coding knowledge. Preferably if you are using this method, you’ve built a custom plugin before. If not, it is highly recommended that you either use Method 1 described above, or read up on how to code a custom plugin.
You can easily add background images to your WordPress website with Full Screen Background Images.
Add a Background Image in WordPress – CSS Option
WordPress adds CSS classes to the <body> of each page on your site. You can use CSS to add a custom background image to each individual post, page, category, author, or other page on your site using these classes.
The trick is to figure out which class to use. You can right click anywhere on the page where you want a background image, then select Inspect or Inspect Element from the menu. Find the <body> tag (hint: use Ctrl [Windows] or Cmd [Mac] + F to search for the word “body”). From there you can find the class added to the page.
For example, if you have a category called baking, WordPress will automatically add CSS classes like this to your baking category page.
<body class="archive category category-baking category-7"> |
In this case, you can use either the category-baking or category-7 to style this specific category page. This example assumes that your “baking” category is category ID #7.
Your CSS would look something like this, and can be added to the Appearance > Customize > Additional CSS section.
body.category-baking{ background-image: url("https://example.com/wp-content/uploads/2018/06/a-background-image.jpg"); background-position: left top; background-size: auto; background-repeat: repeat; background-attachment: fixed; } |
You would need to work with the various properties to get the image to display as desired. For example, if you have a larger image, you may not want it to repeat, while a smaller image may need to repeat in order to cover the entire background.
While this will work, it doesn’t allow for a slideshow effect for multiple background images the way Full Screen Background Images does. Plus, you will need to repeat this code for each page on your site, or add the correct class to this code if you are using it on multiple pages.
Add a Background Image in WordPress – Backstretch.js Option
This option to add a background image in WordPress is definitely more difficult, but it can have a nice effect on your website’s background. You can decide whether you want to create a new plugin, or add this to your child theme. It should work fine either way. I’m assuming if you’re going this route I don’t need to explain how to create a custom plugin or edit a theme. If this is all foreign to you, my intro to WordPress plugin development tutorial might be worth looking into.
First, download the latest version of backstretch.js. Add jquery.backstretch.min.js to your plugin or theme’s js directory.
Next, create another file in your js directory. For this example, we’ll call it background-image.js.
In the background-image.js file, we’ll need to add a little code to tell backstretch what to display and how to display it.
jQuery(function($){
	var images = new Array( 'http://example.com/wp-content/uploads/2018/06/background-image-1.jpg', 'http://example.com/wp-content/uploads/2018/06/background-image-2.jpg' );

	$.backstretch( images, { duration: parseInt( 2000 ) , fade: parseInt( 100 ) } );
}); |
Next, in your plugin’s main file or your theme’s functions.php file, enqueue the necessary scripts.
function sd_load_background_images_jquery() { wp_enqueue_script( 'jquery' ); wp_enqueue_script( 'backstretch', 'path-to-your-plugin-or-theme-js-directory/jquery.backstretch.min.js', array( 'jquery' ) ); wp_enqueue_script( 'background-image', 'path-to-your-plugin-or-theme-js-directory/background-image.js', array( 'jquery' ) ); } add_action( 'wp_enqueue_scripts', 'sd_load_background_images_jquery' ); |
The method described above will add a slideshow effect of two images on every page on your site. This is great if that’s the effect you’re going for. However, it doesn’t have the flexibility of defining specific background images on individual pages throughout your site.
Add Background Images to Individual Pages
In order to have the flexibility of Full Screen Background Images, you will need to sort of repeat the above coding steps for each background image, you want to display on your site.
To do this, you would need to use WordPress conditional tags when enqueueing the scripts. Then, the function will check to see if you are on a specific page, and enqueue the appropriate script for that page.
For example, let’s say we want to display a certain background image on three blog posts, and another background image everywhere else. We would modify the enqueue function above to look something like this:
function sd_load_background_images_jquery() { wp_enqueue_script( 'jquery' ); wp_enqueue_script( 'backstretch', 'path-to-your-plugin-or-theme-js-directory/jquery.backstretch.min.js', array( 'jquery' ) ); if ( is_single( array( 17, 19, 14 ) ) ){ // File that has the special background image for blog posts #17, 19, and 14. wp_enqueue_script( 'blog-post-special-background-image', 'path-to-your-plugin-or-theme-js-directory/blog-post-special-background-image.js', array( 'jquery' ) ); } else { // File that has the background image for all other pages on the site. wp_enqueue_script( 'background-image', 'path-to-your-plugin-or-theme-js-directory/background-image.js', array( 'jquery' ) ); } } add_action( 'wp_enqueue_scripts', 'sd_load_background_images_jquery' ); |
You would then need to copy the original background-image.js file into a new blog-post-special-background-image.js file and make the appropriate changes. With this method, you can string multiple conditional tags to add different background images all over your site.
This method is a tedious way to add a background image in WordPress though. It’s way easier to use Full Screen Background Images as you won’t have to mess around with the code and you get a nice user interface to quickly make changes. Swapping out background images is just as easy as uploading or selecting a new one from your media library.
Final Thoughts on Adding a Background Image in WordPress
I hope this post has helped you learn how to add a background image in WordPress. There are a lot of different methods to add a background image, and some may not have even been covered here. If you know of another way to add a background image to your WordPress site, please share in the comments. Or, if you have used one of these methods on your site, share a link in the comments below!


Hello Scott, great article!!!
I installed the plugin and can upload a background image in the Appearance –> Fullscreen BG Image
However, I do not have the options to specify to which pages/categories this background image should apply nor the image appears in the background… what could be wrong?
I work with twenty seventeen theme..
Thanks for your support!
Greetings,
If you are using the free version of the plugin from WordPress.org, you will get the same image across the whole site. However, you can specify a different image on each page/category/etc. with the pro version of the plugin from https://fullscreenbackgroundimages.com
Beautiful! Thanks for sharing